How Smartphone Sensor Calibration Shapes Your Ghost Hunt: Making EMF Detections More Reliable
If you use a smartphone EMF app during a ghost hunt, calibration is not a technical detail you can ignore. It is the difference between a reading that reflects the environment and a reading that mostly reflects your phone. In other words, a shaky magnetometer can turn ordinary changes in the room into convincing but misleading “spikes.”
That matters a lot when you are trying to build credible paranormal evidence. A phone tucked near a magnetic case, a metal railing, a car door, or even the phone’s own internal sensor drift can create the kind of fluctuation that looks dramatic on screen. The good news is that you do not need lab equipment to improve reliability. A few practical checks, a basic understanding of the errors involved, and the right app behavior can make your EMF readings much more trustworthy.
Why Sensor Calibration Matters in Ghost Hunting
Ghost hunting apps rely heavily on the phone’s built-in magnetometer, and sometimes other sensors like the accelerometer and gyroscope, to detect changes in the surrounding magnetic field. But a sensor does not simply report the world perfectly. It reports the world through its own distortions, offsets, and alignment errors. If those are not handled, the app can mistake sensor noise for an environmental event.
That is especially important in an investigation setting because people tend to interpret an unexpected rise in EMF as something meaningful. If the phone is poorly calibrated, you may end up chasing a reading that was created by sensor bias rather than by the location itself. Over time, that can undermine trust in your evidence and make it harder to compare one session with another.
What Smartphone Calibration Actually Means
In plain English, calibration means teaching the phone what “normal” looks like so it can correct for its own imperfections. For a magnetometer, that usually means estimating how the sensor is offset, stretched, tilted, or otherwise skewed before those raw values are shown to you as EMF data.
Research on magnetic sensors describes the main error sources as bias or offset, scale-factor error, cross-axis non-orthogonality, soft-iron distortion, and hard-iron distortion, with bias often being the biggest contributor (https://pmc.ncbi.nlm.nih.gov/articles/PMC8401862/). In practice, that means the sensor may consistently read too high, too low, or differently depending on direction.
The goal of calibration is not to make the phone perfect. The goal is to make the readings stable enough that the changes you see are more likely to come from the environment than from the device itself.
Hard-Iron vs Soft-Iron Distortion Explained
Two of the biggest magnetometer problems are hard-iron and soft-iron distortion. Hard-iron distortion comes from permanent magnetic sources near the sensor, such as speakers, magnets, or magnetized parts of the device. It adds a constant shift to the readings, like moving the whole baseline up or down. VectorNav notes that hard-iron shifts as much as 200 mGauss on one axis and 100 mGauss on another have been measured (https://www.vectornav.com/resources/inertial-navigation-primer/specifications--and--error-budgets/specs-hsicalibration).
Soft-iron distortion is a little different. Instead of shifting the baseline, it warps the shape of the magnetic field the sensor sees. Think of a circle becoming an oval, or a sphere becoming a stretched blob. This can happen when nearby metal bends magnetic lines of force and causes the sensor to respond unevenly depending on orientation.
A useful way to think about it is this: hard-iron error moves the reading, while soft-iron error bends it. If you do not correct for both, your EMF app may appear to react to motion, even when the field is actually steady.
Offset Bias, Sensitivity Errors, and Sensor Misalignment
Calibration also has to deal with simpler but still important issues like offset bias, sensitivity errors, and misalignment between axes. Offset bias means the sensor is not centered at zero when it should be. Sensitivity errors mean one axis may exaggerate small changes while another axis underreports them. Misalignment means the sensor axes are not perfectly orthogonal, so a change that should appear on one axis bleeds into another.
These problems are not just theoretical. In a calibration example using a Sensortag device, accelerometer data under static conditions revealed a -0.1 g bias on one axis due to PCB tilt, which is large enough to visibly affect readings (https://ece.montana.edu/seniordesign/archive/SP14/UnderwaterNavigation/Sensor Calibrations.html). That is the kind of error that can make a phone seem like it is “reacting” when it is simply sitting at an awkward angle.
Cross-axis coupling is also well known in magnetic sensors. When one axis leaks into another, the resulting distortion can be modeled and corrected with matrix transformations, but if it is left untreated it can make the data look unstable or strangely directional (https://dspace.cvut.cz/handle/10467/81863).
How Bad Calibration Creates False EMF Spikes
The practical problem for ghost hunters is that bad calibration can create the illusion of sudden EMF changes. If the phone is rotated, tilted, moved near a metal surface, or brought close to a magnetic accessory, the raw magnetometer output may jump even though the local field has not changed in any paranormal sense.
Because many ghost hunt apps present these values in real time, the jump feels meaningful. A spike appears, the room gets quiet, and the coincidence can feel compelling. But if the sensor has a strong hard-iron bias or soft-iron warp, that spike may simply reflect device orientation or interference from the environment.
This is why calibration is so important before recording evidence. Without a stable baseline, you are not really measuring anomalies in the location. You are measuring anomalies in the phone’s relationship to the location.
Research-Backed Examples of Smartphone Sensor Error
One of the clearest ways to understand calibration is to look at how researchers model magnetometer behavior. A measured magnetic field can be represented as a combination of the true Earth field, external disturbance, hard-iron bias, and a soft-iron transformation. In VectorNav’s formulation, the measured field tilde m is influenced by a bias term and a distortion matrix, which means the phone can report something that is mathematically different from the real field even before noise is considered (https://www.vectornav.com/resources/inertial-navigation-primer/specifications--and--error-budgets/specs-hsicalibration).
In indoor magnetic-field mapping with smartphones, researchers estimate soft-iron matrix A and hard-iron bias b by rotating the phone through many directions and fitting the readings to a sphere. When the calibration is done properly, the distortion matrix becomes close to the identity and the bias becomes very small, which is exactly what you want for reliable field measurements (https://pmc.ncbi.nlm.nih.gov/articles/PMC9183029/).
That is a helpful lesson for ghost hunters. If the phone has not been moved through enough orientations, the sensor may never reveal its true distortions, and your app may continue displaying cleaner-looking data than the hardware deserves.
Easy Magnetometer Checks You Can Do Before a Hunt
You do not need a lab to get a basic sense of whether your phone is behaving well. Start by opening your EMF app in a quiet area and holding the device still for several seconds. A healthy setup should settle into a relatively stable baseline rather than jittering wildly while nothing around it changes.
Next, slowly rotate the phone in your hands. If the numbers swing dramatically with orientation, that does not automatically mean the room is active. It may mean the magnetometer still needs calibration or is sitting near interference. You are looking for smooth, predictable movement rather than sudden erratic jumps.
Another useful check is repetition. Put the phone in the same spot, leave it untouched, and compare the reading after a minute or two. If the baseline drifts a lot without environmental cause, that is a sign to recalibrate or move away from the source of interference.
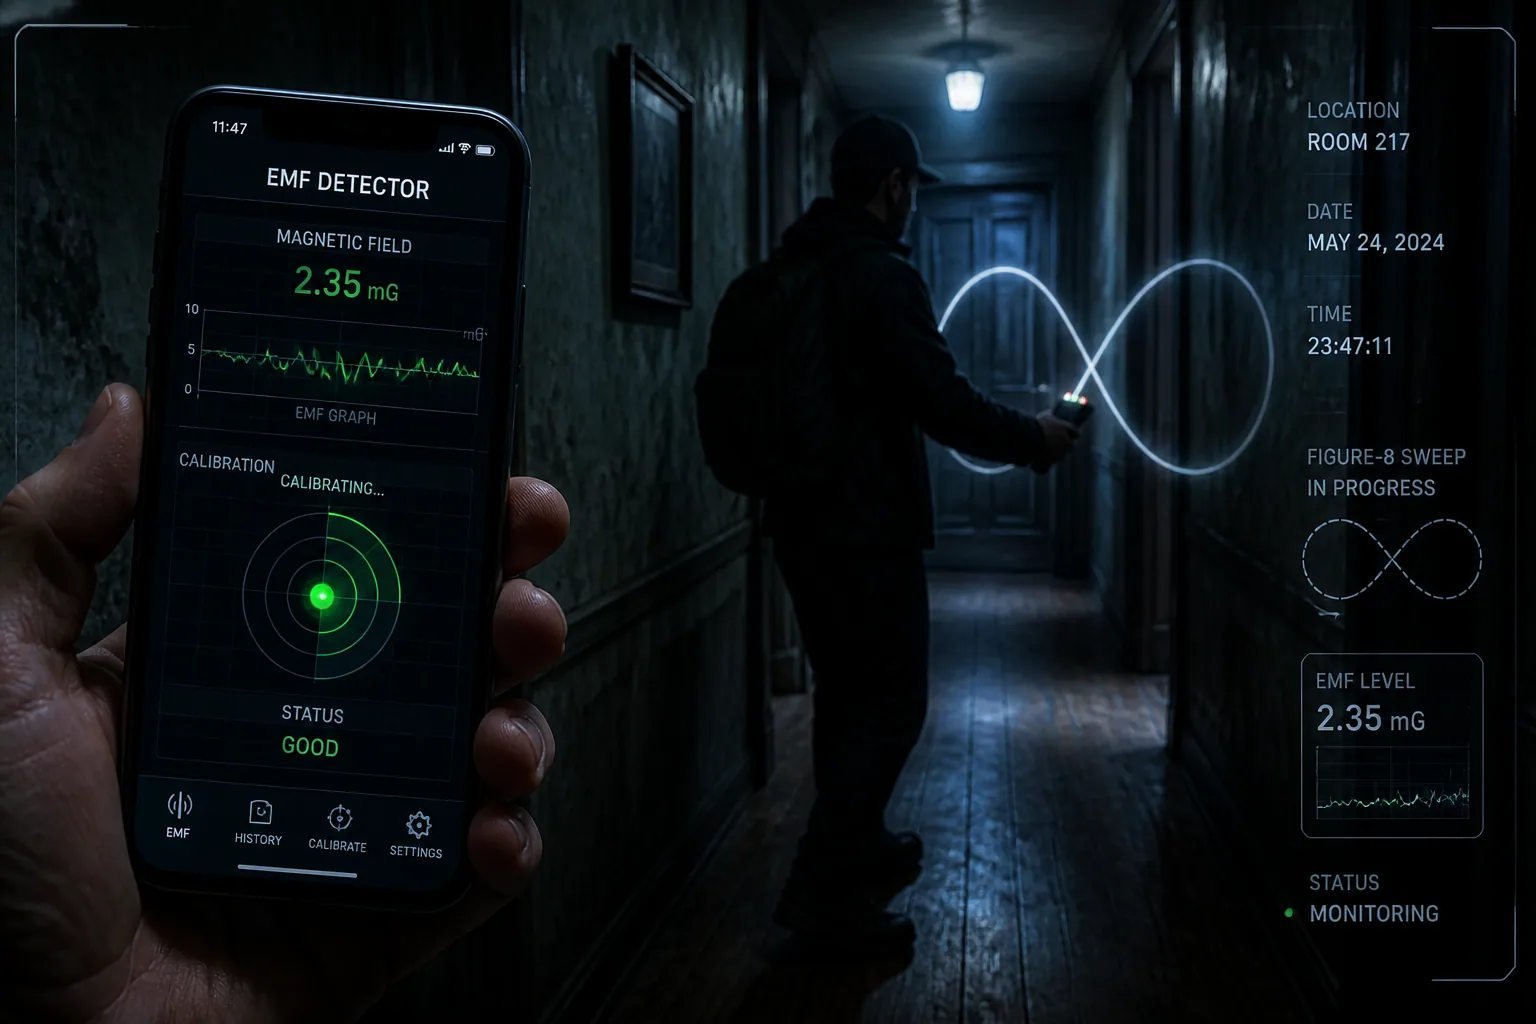
Figure-8 Motions, Rotations, and Stability Testing
The classic way to calibrate a magnetometer is still useful for a reason: it works well enough for everyday use. Traditional user-based methods involve rotating the phone in a figure-8 pattern or sweeping full 360-degree rotations around multiple axes so the app can collect samples from many orientations (https://www.vectornav.com/resources/inertial-navigation-primer/specifications--and--error-budgets/specs-hsicalibration and https://www.appelsiini.net/2018/calibrate-magnetometer/).
Why does this help? Because calibration depends on seeing the sensor from many angles. If all the samples come from one orientation, the app cannot tell whether a high value is caused by a real magnetic field or by a device bias. Full rotations help the software fit the readings to an ideal sphere and estimate the corrections needed to undo hard-iron and soft-iron effects.
A simple field routine is to calibrate, then keep the phone still and see whether the reading holds steady. If the post-calibration baseline is much more consistent, you have a better chance of catching real changes later in the session.
How Cases, Magnets, and Metal Frames Skew Readings
One of the easiest mistakes to make is calibrating your phone while it is still inside a magnetic case or close to a metal object. That can bake the interference into your baseline and make every later reading look “normal” even though the device is being distorted from the start.
Magnetic clasps, rings, mounts, speaker magnets, and even some protective accessories can shift the sensor enough to create a false sense of activity. Metal frames and rails can also create soft-iron effects, bending the field in a way that depends on your phone’s angle. In a ghost hunt, that might look like a location-specific anomaly when it is really a device-specific artifact.
A good rule is to calibrate and test the phone in the same physical setup you plan to use during the investigation. If you normally hold it in a case, use that case when testing. If you suspect the case is magnetic, remove it and compare the baseline immediately.
Indoor vs Outdoor Comparison Tests for Cleaner Baselines
A simple way to separate device problems from location problems is to compare readings indoors and outdoors. Outdoors, away from large metal structures and electronics, the magnetic environment is often cleaner. Indoors, especially in older buildings, there may be more interference from wiring, appliances, rebar, and fixtures.
Start by recording a short baseline outdoors in an open space, then repeat the same process inside the haunted location or another indoor environment. If the phone behaves very differently only indoors, that difference may reflect environmental interference rather than paranormal activity. If the reading is unstable in both places, the sensor itself may be the bigger issue.
This kind of comparison is not about proving or disproving a ghost hunt. It is about knowing when your hardware is adding too much uncertainty to be useful.
Calibration Methods That Don’t Need Special Equipment
The most practical calibration methods for everyday users are the ones that do not require special tools. Figure-8 motions, slow full rotations, and repeat stability checks are all accessible and can provide meaningful improvement when done carefully. Many apps also use fitting routines behind the scenes to estimate the offsets and distortions from the samples you provide.
If your phone or app supports it, you may also see online or automatic calibration that improves sensor behavior over time rather than requiring one perfect setup moment. These approaches can be especially helpful for casual users who move between different environments and do not want to manually reset everything before each session.
The key is consistency. Whatever method you use, keep the conditions similar from one hunt to the next so you can compare results more honestly.
Using Inertial Sensors and Online Calibration in the Field
Modern calibration is increasingly supported by the phone’s other sensors, especially the accelerometer and gyroscope. These inertial sensors help estimate motion and orientation, which makes it easier to separate a genuine magnetic change from a change caused by how the device is being held.
Researchers have shown that magnetometer calibration can happen during navigation without manual rotation, using methods embedded in SLAM-based systems. A 2024 arXiv study, “Saying goodbyes to rotating your phone,” demonstrated calibration during navigation with factorized particle filters and reported comparable accuracy to manual calibration (https://arxiv.org/abs/2409.01242).
Even more recent work on SL©AMma describes online joint estimation of position and calibration, with trials achieving more than 80% reduction in drift compared to using inertial sensors alone (https://arxiv.org/abs/2604.19946). For consumers, that means the future of smartphone sensor calibration is likely to become less manual and more automatic.
What SLAM-Based Calibration Means for Everyday Users
SLAM stands for Simultaneous Localization and Mapping. In everyday terms, it means the phone is trying to understand where it is and what the surrounding space looks like at the same time. When calibration is integrated into SLAM, the device can learn from movement through the environment instead of relying on a separate calibration ritual.
For ghost hunters, the practical benefit is simple: the app may get better at separating motion-related sensor artifacts from environmental changes as you walk through a location. That does not eliminate all error, but it reduces the chance that a brief wrist turn or hallway turn looks like a supernatural spike.
This is one reason modern apps should keep improving sensor correction in the background rather than assuming the user will always perform a perfect pre-hunt calibration.
How to Cross-Check EMF Anomalies with Audio and Video
EMF evidence is most convincing when it agrees with other data streams. If a spike occurs at the same time as an audio event, a visible light change, or a meaningful environmental shift, the case for a real anomaly is stronger. If the EMF spike happens only when the phone is turned, tapped, or brought near a metal object, then calibration problems are a more likely explanation.
Cross-checking matters because sensor issues can create false correlations. A bad magnetometer reading can align with a camera movement or microphone bump simply because the investigator moved the device, not because the environment changed. By reviewing EMF, audio, and video together, you can spot patterns that are device-driven rather than location-driven.
This is where careful logging becomes essential. Timestamps, phone orientation, and environmental notes help you figure out whether multiple signals truly point to the same event.
Best App Features for More Reliable EMF Investigations
If you are using a ghost hunting app like Ectify, the best features are the ones that help you understand sensor quality instead of hiding it. A good app should prompt users to calibrate when the magnetometer appears unstable and should show a simple sensor health indicator so you can see whether the device is behaving normally before the session starts.
Smoothing options can also be useful, as long as they are transparent. Smoothing can reduce jumpy readings, but it should never hide the raw data completely. You want to know both the cleaned-up number and the underlying spikes so you can judge whether they look meaningful or just noisy.
Anomaly logging is another useful feature. If an app marks sudden changes with timestamps and lets you add notes about location, case type, nearby metal, or phone orientation, it becomes much easier to compare sessions later. For a practical example of a session-based ghost hunting workflow, Ghost Detector: Ectify offers real-time EMF detection, session history, and recording tools at https://findthe.app/ectify-fc72z0.
A Simple Workflow for Logging and Sharing Credible Findings
A reliable ghost hunt workflow should start before you enter the location. First, test the phone indoors and outdoors to see whether the baseline is stable. Then remove suspicious accessories, recalibrate if needed, and repeat a short stillness test. If the readings remain predictable, begin the session and log your starting conditions.
During the hunt, note any large movement of the phone, proximity to metal objects, or sudden changes in the environment. If an EMF event happens, review whether audio or video also captured something unusual at the same moment. The more context you collect, the easier it is to tell the difference between a real environmental change and a sensor artifact.
After the hunt, compare the session to previous ones. Look for patterns that repeat across nights, not just dramatic one-off spikes. Over time, this habit will help you build evidence that is more consistent, easier to share, and much more credible to other investigators.
