How to Analyze EVP Recordings Like a Pro: Tips, Tools & Common Mistakes
If you want your EVP work to be taken seriously, the analysis matters just as much as the recording. A shaky review process can make ordinary noise sound meaningful, while a disciplined workflow can help you separate possible anomalies from everything else happening in the room. The goal is not to force a voice out of every clip. The goal is to create a repeatable method that reduces bias, preserves context, and gives each recording a fair review.
That starts before you even open your audio software. A cleaner session, the right gear, and careful documentation all make later analysis much more credible. It also helps to understand the usual EVP classification system, because not every clip deserves the same level of confidence or scrutiny.
Why EVP Analysis Matters for Credibility
The biggest problem in EVP research is not always the recording itself. It is interpretation. Human hearing is excellent at finding patterns, even when there may not be a voice present. This is why two people can listen to the same clip and disagree completely about what was said. A professional approach treats every capture as evidence to be tested, not as proof by default.
Credible EVP analysis depends on consistency. If you always use the same review steps, the same documentation habits, and the same standards for labeling a clip, your conclusions become far more defensible. That is especially important when you want to compare sessions across locations or share clips with other investigators for blind review.
Setting Up a Cleaner Recording Environment
A strong analysis begins with a clean recording environment. Before the session, record a baseline ambient clip for 5 to 10 minutes with all gear powered on and everyone silent. This gives you a reference for normal room sound, such as HVAC hum, ticking clocks, traffic, distant voices, or electrical noise. According to Higgypop’s EVP session guidance, baseline recording is one of the simplest ways to improve later review quality, because it helps you recognize what was already present in the environment before anything unusual happens: https://www.higgypop.com/news/how-to-conduct-an-evp-session/
Keep the recorder on a stable surface and away from walls, vents, or objects that can vibrate. Avoid touching or moving it during capture, because handling noise can create sharp transients that are easy to mistake for a voice. If you are investigating with a group, agree on verbal tagging in advance. A quick spoken note like “door creak” or “car passes” can save hours of confusion during review.
The environment should also be controlled as much as possible. Turn off unnecessary electronics, remove fans when safe, and note anything that cannot be disabled. The more you know about the room, the easier it becomes to separate a real anomaly from an expected sound event.
Best Microphone and Recorder Settings for EVP Sessions
For EVP work, microphone choice matters a lot. Research from Higgypop recommends an omnidirectional condenser microphone because it captures sound evenly from all directions and is more sensitive than a dynamic mic: https://www.higgypop.com/news/microphones-for-evp-recording/ That broader pickup pattern can be helpful when you do not know where a subtle sound is coming from, especially in a room where reflections and distant noises can matter.
On the recorder side, uncompressed WAV is the minimum format you should aim for. Lossy formats like MP3 can throw away detail that may be important during spectral inspection. Ideal settings are typically 44.1 kHz at 16-bit, or 48 kHz at 24-bit if your device supports it. Higher-resolution recording gives you more headroom for analysis and reduces the chance that a faint sound gets lost in compression artifacts.
Recorder self-noise is another factor worth paying attention to. A useful guideline is to look for a recorder with self-noise around 22 to 25 dB(A) or lower. The lower the self-noise, the easier it is for faint content to stand out above the noise floor. A high signal-to-noise ratio does not prove a voice is anomalous, but it does make review much easier and more reliable.
If you use a voice-activated recorder, only do so if the sensitivity and trigger settings can be adjusted carefully. The best setups use a pre-record buffer and a backup continuous mode so you do not lose context. Poorly calibrated VARs can create lots of false positives, while well-tuned ones can reduce irrelevant recordings significantly. For analysis work, context is everything.
Understanding Class A, B, and C EVPs
A good analyst needs a clear framework for grading audio. The commonly used classification system separates EVP captures into Class A, B, and C based on clarity and evidential value. UKPX describes Class A EVPs as clear and unaltered, with the voice audible without enhancement and generally understood by most listeners. These are usually the strongest clips, especially when recorded in a quiet environment with good equipment: https://ukpx.org/2025/10/12/electronic-voice-phenomena-evp-best-practices-and-technical-guidance/
Class B EVPs are audible but less distinct. They often require some processing, and different listeners may interpret them differently. These clips can still be useful, but they need careful handling because listener bias becomes more of a risk. A Class B capture should never be treated like a slam dunk unless the surrounding context is also strong.
Class C EVPs are the weakest category. They remain unclear or unintelligible even after processing, and the ambiguity may come from environmental noise, interference, or just a low-level anomaly. In practice, these are often the most dangerous clips to overclaim. If a recording stays unclear after reasonable cleanup, it is usually better to document it and move on than to force meaning into it.
How to Review Audio Without Introducing Bias
Bias creeps in very easily during EVP review. If you already expect a certain phrase, your mind can start hearing it everywhere. The best defense is to review the clip in stages and keep your first pass as neutral as possible. Listen once at normal volume before touching any tools. Ask yourself only what is clearly there, not what it might be.
After the first pass, compare the clip against your notes and the session log. Did someone speak nearby? Was there a car door, a cough, a footstep, or a chair scrape? Those mundane sounds should already be tagged. If they were not, mark them now before continuing. This helps prevent a normal sound from being mentally upgraded into something paranormal.
It also helps to let other people review the clip blind. If several listeners independently identify the same sound without being told what you think it is, the clip becomes more interesting. If everyone hears something different, that is usually a sign that the audio is too ambiguous to call evidence.
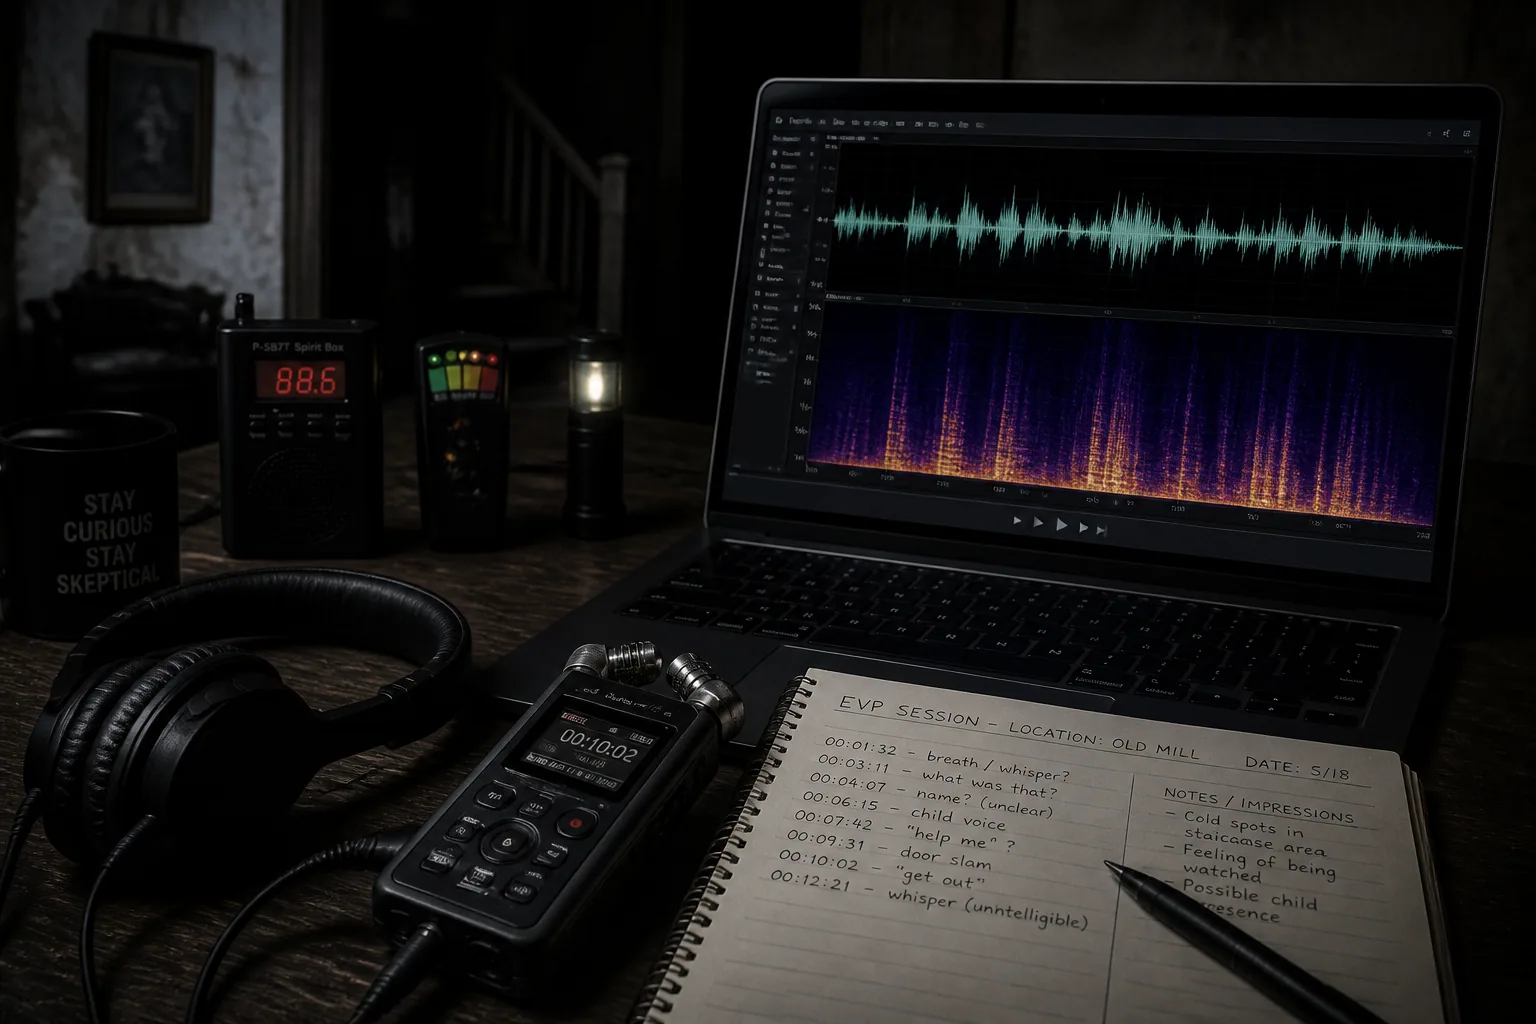
Using Audacity and Adobe Audition for EVP Cleanup
Audacity and Adobe Audition are both useful for EVP analysis because they let you inspect waveforms, amplify quiet passages, and switch into spectral or frequency-based views. Audacity is especially accessible for beginners, while Adobe Audition offers more advanced control and a deeper editing environment. The important thing is not the tool itself but how carefully you use it.
A solid workflow usually starts with a copy of the original file so you never overwrite your source recording. Then listen in the unedited state, make a rough note of timestamps, and only after that begin a controlled cleanup. Hollyland recommends using a noise profile from a silent section when applying noise reduction and being careful not to over-process the file: https://www.hollyland.com/blog/topics/use-audacity-spectral-tools
In both Audacity and Audition, the temptation is to push the audio until a voice seems to emerge. That is exactly what you want to avoid. If the clip only becomes intelligible after extreme manipulation, then the final result may be an artifact of processing rather than an actual captured voice.
Filtering, Amplifying, and Normalizing the Right Way
Amplification is helpful, but it should be done carefully. The purpose is to make the recording easier to hear, not to create a new recording. Raise the gain just enough to inspect the content, then return to a comfortable listening level. If you push the file too hard, you can introduce clipping or exaggerate background hiss, which makes interpretation worse instead of better.
Normalization is useful when a clip is very quiet, but it should be applied conservatively. Once waveform data is clipped above 0 dB, it cannot be recovered. This means you should always check your levels before and after any gain changes. If the original file is already distorted, no amount of cleanup can restore missing detail.
Filtering should be used to reduce obvious problems, not to erase entire parts of the audio spectrum. Hollyland specifically advises attenuating offending frequencies instead of deleting whole bands, for example by reducing them by 6 to 10 dB rather than carving them out completely. Overusing noise gates and sharp EQ notches can create unnatural artifacts that sound more voice-like than the original issue ever did.
How Spectrograms Help Spot Potential Voice Anomalies
A waveform shows amplitude over time, but a spectrogram can reveal how energy changes across frequencies. That is why spectral view is so useful for EVP work. In Audacity or Adobe Audition, you can look for narrow bands, short bursts, or unusual shapes that stand out from ordinary background noise. A human voice often has formants and harmonic structure that may be easier to recognize in a spectrogram than by ear alone.
That said, a spectrogram is not proof. It is just another lens. Random noise, electronic interference, and environmental sounds can all create interesting-looking patterns. The value of spectral inspection is in helping you compare a suspicious section against the rest of the file and against your baseline environment recording.
Use spectral tools to test your assumptions, not confirm them. If the shape in the spectrogram matches a known event, such as a metallic click or a passing vehicle, then you have explained it. If it remains unexplained after comparison, then it may deserve more attention, but still not automatic acceptance as evidence.
Tagging Environmental Sounds During and After a Session
One of the most practical habits you can build is real-time tagging. If a door opens, a floorboard creaks, a dog barks, or someone coughs, say it out loud during the session. Those short labels become anchors later when you review the recording. They stop you from wondering whether a sound was mysterious when it was actually documented in the moment.
After the session, continue tagging in your notes. If you identify a sound during review, mark the exact timestamp, the likely source, and the confidence level of that identification. Over time, this creates a reference library of local environmental audio. That library can be incredibly useful when similar sounds show up in future investigations.
Tagging is not just housekeeping. It is a major part of preventing false positives. A clean EVP report should show that the investigator actively ruled out ordinary causes before assigning any paranormal significance.
Building an EVP Log for Better Documentation
A reliable EVP log makes your investigation more professional and easier to revisit. At minimum, include the session date, location, weather, room conditions, participants, equipment used, microphone placement, recorder settings, and any unusual events. If you used a voice-activated recorder, note its sensitivity and trigger behavior as well.
Your log should also track timestamps for notable sounds, any questions asked during the session, and any processing steps applied during analysis. That way, if a clip later becomes interesting, you can trace exactly how it was captured and how it was reviewed. Good documentation is often what separates a credible study from a story.
Many investigators also keep a review verdict in the log, such as “environmental,” “indeterminate,” or “possible EVP Class B.” This keeps the language disciplined and prevents the file from being labeled more strongly than the evidence supports.
Common False Positives: Pareidolia, RF Interference, and Ambient Noise
Pareidolia is one of the biggest threats to accurate EVP interpretation. It is the tendency to perceive familiar patterns, especially voices or words, in random or ambiguous sound. Once your brain latches onto a possible phrase, it starts reinforcing that interpretation. That is why blind review and careful note-taking are so useful.
RF interference is another common issue. Nearby electronics, power sources, cables, and wireless devices can introduce strange artifacts into recordings. These artifacts may sound like whispering, clicking, or chirping, but they have a normal technical origin. If a suspicious sound appears near a radio, phone, or charger, that context should be documented before any paranormal conclusion is considered.
Ambient noise is also frequently misidentified. Wind, footsteps, HVAC rumble, room echoes, and mechanical hums can all be mistaken for voices when a listener expects something unusual. UKPX notes that misidentified ambient noise is a major source of false EVP claims, along with over-processing and interference: https://ukpx.org/2025/10/12/electronic-voice-phenomena-evp-best-practices-and-technical-guidance/
Mistakes That Can Ruin an EVP Review
The first major mistake is over-processing. If you stack too many filters, EQ adjustments, and noise reduction passes, you can create a recording that sounds more dramatic but less trustworthy. The second mistake is confirming your expectations instead of testing them. If you decide the clip says a specific phrase before listening carefully, your review is already compromised.
Another common mistake is ignoring the original context. A clip may sound strange in isolation, but once you check the session notes, it may line up perfectly with a known noise source. Failing to keep that context attached to the file is one of the fastest ways to misread a recording.
A final mistake is calling something evidence when the quality is too low. If a clip is barely audible even after reasonable cleanup, it belongs in the archive as an interesting but unconfirmed event, not as a headline capture.
A Step-by-Step EVP Analysis Workflow You Can Repeat
A repeatable workflow keeps your reviews consistent. Start by copying the original file and saving an untouched master. Next, listen once without editing and note any obvious sounds. Then check your session log and baseline ambient recording so you can match timestamps to known events.
After that, make light adjustments only if needed. Normalize the level, apply careful noise reduction using a silent section as the profile, and inspect the suspect area in waveform and spectrogram views. Compare the result against the original version so you can see whether clarity improved or whether the processing changed the character of the sound too much.
Then do a second-pass review, ideally with another listener who has not seen your interpretation. If the same phrase or anomaly is independently recognized and the surrounding context does not explain it, the clip may deserve a stronger classification. If not, keep it documented but unconfirmed.
Final Checks Before Calling a Clip Evidence
Before you label a clip as evidence, run through one last checklist. Is the original source file intact? Are the recording settings documented? Was the environment quiet enough to support the claim? Have all obvious environmental sounds been ruled out? Did processing remain minimal and transparent? Were multiple listeners able to identify the same content without prompting?
If the answer to any of those questions is no, the clip probably needs more caution. Strong EVP work is not about making every file mysterious. It is about narrowing the field until only the most defensible clips remain. That discipline is what makes your results more useful to you and more believable to anyone else who reviews them.
If you want a simple way to capture and organize investigation audio in the field, Ghost Detector: Ectify can also help you record sessions and keep a history of your activity in one place: https://findthe.app/ectify-fc72z0. For investigators who like to document everything from the start, that kind of session history can make later EVP review much easier.
