How to Restore EVP & Spirit Box Audio: Techniques to Bring Out Hidden Voices Without Introducing False Positives
If you work with EVP or spirit box recordings, audio restoration can be the difference between a clip that is impossible to evaluate and one that is actually worth sharing. But there is a catch. The more you clean audio, the easier it becomes to create artifacts, distort speech, or make random noise sound meaningful. That is why the best EVP restoration workflow is not about making audio sound spooky. It is about making the recording easier to inspect while preserving what was really captured.
In this guide, we will walk through a credibility-first process for ghost hunters, paranormal creators, and beginner-to-intermediate investigators. You will learn how to preserve originals, work on copies, remove hiss, hum, and room noise, clean spirit box sessions without destroying useful speech detail, and audit every edit for false positives. We will also look at free and premium tools, including Audacity, Adobe Audition, and iZotope RX, so you can choose the right level of control for the recording you have.
Why EVP Audio Restoration Matters More Than Most Investigators Realize
EVP restoration matters because most paranormal audio is recorded in conditions that are already hostile to clarity. You may be dealing with a phone mic, a cheap recorder, a spirit box sweeping radio noise, or a crowded location full of HVAC hum, traffic, and echo. In that environment, tiny improvements in signal-to-noise ratio can make a clip easier to review. But the same process can also create interpretation traps.
This is especially important because EVP listening is subjective. Research on paranormal transcription has shown that different listeners often disagree on what they think they heard, even when reviewing the same clip. One study involving 24 paranormal investigators and 94 clips found frequent disagreement in transcription, which is a reminder that cleaned audio can still be interpreted very differently. A related study also suggests that pareidolia and prior belief can increase the chance of hearing EVPs in random noise, with around 36% of participants reporting EVP-like perceptions after familiarization. Source: https://www.researchgate.net/publication/340914198_Predictors_of_Hearing_Electronic_Voice_Phenomena_in_Random_Noise_Schizotypy_Fantasy_Proneness_and_Paranormal_Beliefs and https://atransc.org/radiosweep-study2/
So the goal is not to force a voice out of the recording. The goal is to reduce distractions, isolate the most trustworthy information, and make the clip easier to evaluate without changing its meaning.
Start Here: Preserve the Original Recording Before You Touch Anything
Before you clean a single sample, save the original recording in a secure place and never overwrite it. This sounds obvious, but it is one of the most important habits in audio forensics and one of the easiest to ignore when you are eager to hear something clearer. Work from copies only. Keep one untouched master file, one working file, and, if possible, separate versions at each major edit stage.
A simple workflow looks like this: first duplicate the file, then rename it clearly, then note the recording device, date, location, and any known conditions such as air conditioning, nearby traffic, or spirit box settings. That metadata helps you later determine whether a tone is real environmental interference or something introduced during processing.
This also protects you from confirmation bias. If the final version sounds different from the original and you cannot show the steps between them, your evidence becomes harder to trust. Cleaned audio should be reproducible, not mysterious.
A Safe EVP Cleanup Workflow for Beginners and Intermediate Users
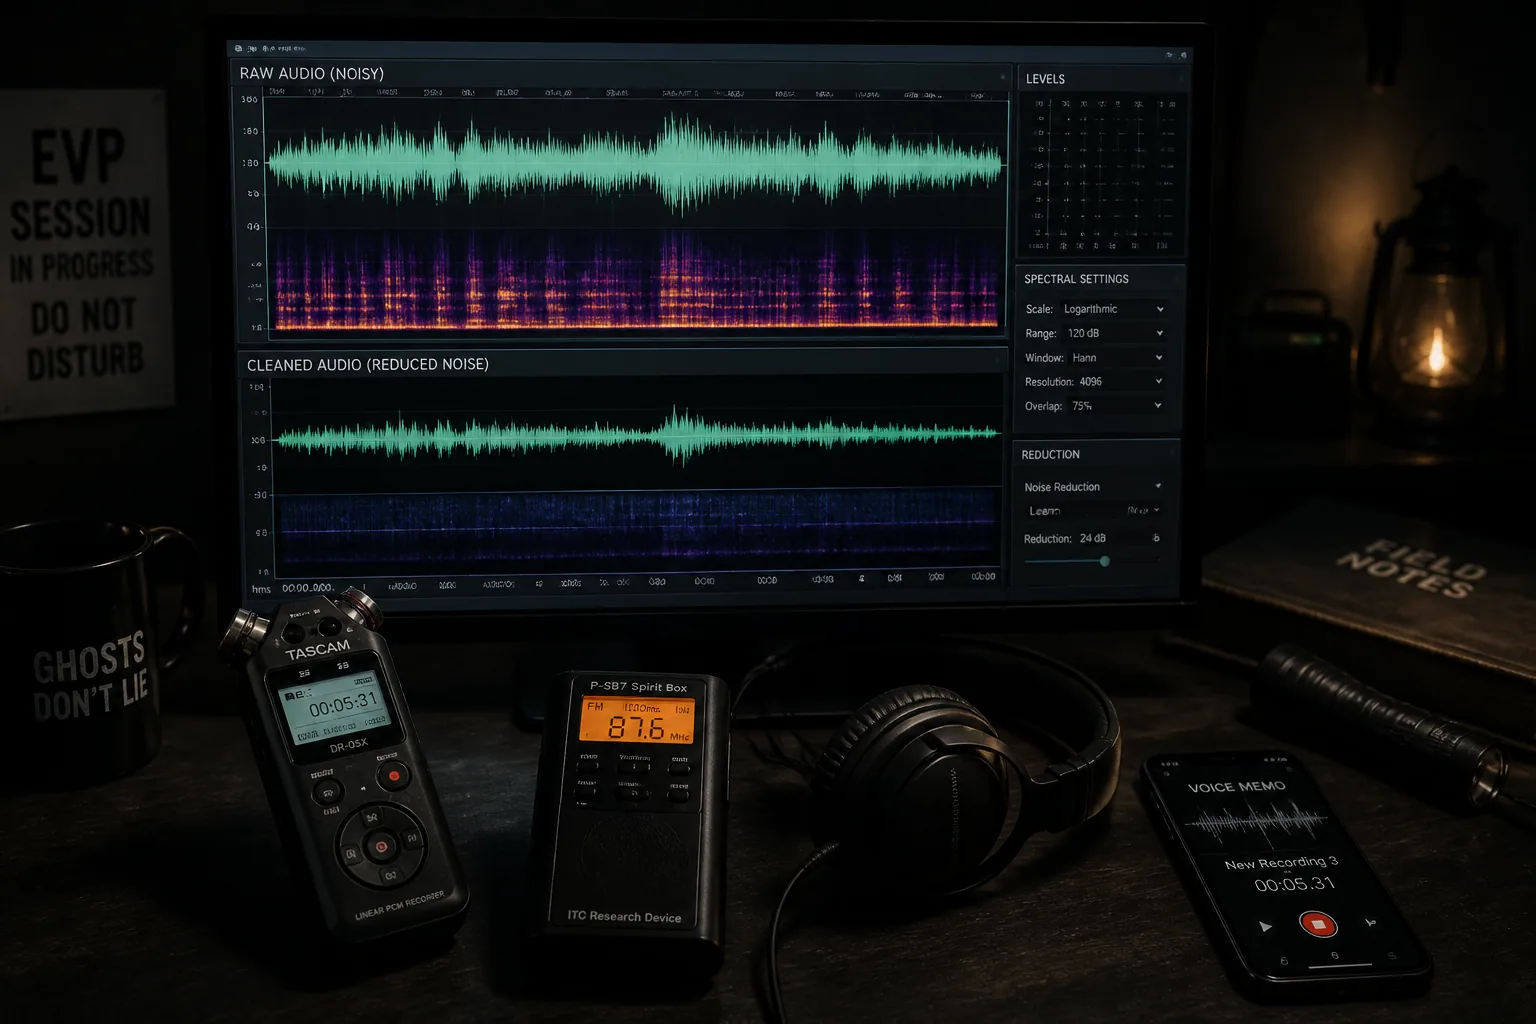
A good cleanup workflow is usually less about one magic tool and more about sequence. Start with the least destructive fixes first, then move to more targeted processing only if needed. A sensible order is: listen to the raw file, identify the noise profile, apply gentle EQ or hum removal, reduce broadband hiss if necessary, inspect the spectrogram, and only then make selective spectral edits.
This order matters because heavy reduction too early can create problems that are harder to diagnose later. If you remove too much noise at the beginning, you may also remove the evidence you needed to understand the recording. In paranormal audio, restraint is usually a better strategy than intensity.
For beginners, Audacity is often enough for basic cleanup, especially when you need to view the spectrogram and remove obvious constant tones. For more serious restoration, Adobe Audition and iZotope RX offer more control over noise reduction, de-hum, and spectral repair. RX’s De-hum module is especially useful because it can remove steady electrical hum and its harmonics with different modes, including Static, Dynamic, and Adaptive Dynamic. iZotope notes that Dynamic mode can use up to 1024 notch filters and reduce artifacts by gating signal when energy rises above hum thresholds. Source: https://www.izotope.com/en/learn/deep-dive-into-rx-de-hum.html
If your goal is credibility, every edit should answer one question: did this make the recording easier to interpret, or did it make it sound more paranormal?
How to Remove Background Noise, Hiss, and Room Ambience
Background noise is usually the first thing to address because it masks weak speech detail and makes EVP clips fatiguing to listen to. In controlled restoration, you usually want to remove low-level broadband noise such as room tone, air handling, and mic hiss without stripping the recording of all natural ambience. If the noise floor becomes too flat, the result can sound artificial and make speech edges more obvious in a bad way.
Adobe Audition’s Noise Reduction effect is useful here because it lets you capture a noise print from a section of audio that contains only room tone, hiss, or hum, then apply reduction across frequency bands. Adobe says this can typically improve signal-to-noise ratio by around 5 to 20 dB while preserving voice clarity when used carefully. Source: https://helpx.adobe.com/audition/desktop/effects-reference/noise-reduction-restoration-effects.html
The safe approach is to sample a clean noise-only section, apply modest reduction, then compare before and after at the same volume. If consonants start disappearing, the reduction is too aggressive. If the clip begins to shimmer, pulse, or sound metallic, you may be hearing musical noise or other artifacts from overprocessing.
Audacity can also help with simpler cleanup, but it is best used for lighter jobs. It can be effective when the background noise is relatively stable, but it is less powerful than dedicated restoration software for messy recordings with layered interference.
How to Remove Electrical Hum with EQ and Notch Filtering
Electrical hum is one of the most common and most fixable problems in EVP audio. It usually sits at 50 Hz or 60 Hz, depending on your region, with harmonics rising above it. You often hear it as a low drone, but in a spectrogram it appears as a steady line or a stack of lines. Because it is narrow-band and repetitive, it is usually a better candidate for notch filtering than for broad noise reduction.
iZotope RX is particularly strong here. Its De-hum module is designed to remove steady hum with notch filters, and the recommended approach is to first isolate a section with just hum and no speech, use the Learn feature to profile the fundamental and harmonic frequencies, then apply the tool while watching Sensitivity, Filter Q, and Bands settings. The same documentation notes that extra harmonic buzz can be handled with tonal noise reduction in the De-noise module. Source: https://help.izotope.com/docs/izotope-rx3-help.pdf
If you are working in a simpler editor, a narrow notch EQ can often reduce the main hum frequency, but be careful. Very narrow Q values and too many notches can hollow out the voice and create a thin, unnatural sound. You want the hum gone, not the body of the speech.
A practical test is to toggle the filter on and off while watching the waveform and spectrogram. If the voice sounds less full but not more intelligible, you may have cut too much. If the hum disappears and the voice remains stable, you are on the right track.
Cleaning Up Spirit Box Recordings Without Destroying Speech Detail
Spirit box sessions are different from simple EVP files because the source material already contains rapid scanning, radio static, and fragments of broadcast audio. That means cleanup has to be even more conservative. The challenge is not to remove all noise. The challenge is to reduce interference enough that possible speech fragments can be reviewed without turning the whole recording into digital mush.
Start by identifying what kind of content you are dealing with. If the clip is mostly sweep noise with occasional voices, the best move may be minimal cleanup plus spectral inspection. If a constant hiss or hum is overpowering the session, use a light pass of noise reduction or de-hum before anything else. Avoid heavy compression, extreme clarity enhancement, or aggressive de-reverberation, because those tools can make ordinary fragments seem more defined than they really are.
One useful rule is to treat spirit box audio like evidence, not like a music mix. You are not trying to polish it for drama. You are trying to make the meaningful parts easier to compare against the raw session.
If you use a platform that records and organizes sessions automatically, such as Ghost Detector: Ectify, you can keep source files and session history together while reviewing exported audio later at https://findthe.app/ectify-fc72z0. That makes it easier to compare raw captures with cleaned versions without losing the context of the original session.
Using Spectral Editing to Isolate Hidden Voices and Problem Frequencies
Spectral editing is where many investigators first start to see the value of restoration. In a spectrogram, time runs horizontally and frequency runs vertically, so hidden tones, clicks, bursts, and voice-like shapes can become visible in ways that the waveform alone does not show. This is especially helpful for identifying narrow interference, clipped consonants, and short tonal artifacts.
Audacity offers spectral selection and editing, which allows you to select a region in both time and frequency and then remove or reduce it. That makes it useful for constant narrow-band tones, such as mains hum or a fixed whistle. Audacity’s manual notes that this method is good for tonal problems but not as strong for complex broadband noise like traffic or ambient hiss. Source: https://manual.audacityteam.org/man/spectral_selection.html
The best practice is to use spectral edits surgically. Remove only what you can identify confidently. If you delete a suspicious-looking patch without understanding what it is, you may erase legitimate speech or create a gap that the ear fills in with imagined content.
Spectral repair tools in premium editors can help when a sound is obviously damaged, but again, the question is whether you are restoring or inventing. A visible shape in the spectrogram is not proof of a ghost voice. It is only proof that something happened at that frequency at that moment.
When to Use Thresholding, Gating, and Voice Activity Detection
Thresholding and gating can be useful when your recording has long stretches of room noise between words, but they are risky if your clip includes very faint speech. The basic idea is simple: anything below a set level gets reduced or muted. That can create cleaner pauses and make hard-to-hear phrases stand out. But if the threshold is too high, it can chop off word beginnings, soften trailing consonants, or create unnatural silence.
Adobe Audition’s Hiss Reduction effect works in a similar spirit by using a noise floor threshold where audio below the floor is reduced and audio above it stays largely intact. Adobe also warns that high Reduce-By values can muffle speech. Source: https://helpx.adobe.com/sg/audition/using/noise-reduction-restoration-effects.html
Voice activity detection can also help you locate candidate speech regions, but it should not be treated as proof that a voice is present. It is simply a signal-processing aid. In paranormal audio, thresholding is best used for previewing, segmenting, and organizing, not for final evidentiary claims.
The Biggest Mistake: Overprocessing Audio Until It Sounds Paranormal
The biggest restoration mistake is not failing to clean enough. It is cleaning so hard that the audio starts to sound unnatural. Overprocessing can introduce musical noise, ringing, pre-echo, spectral smearing, or a brittle, watery texture that makes normal syllables seem uncanny. At that point, you may have created the very thing you were trying to avoid: an artifact that invites false interpretation.
This is especially dangerous when you stack tools. A little noise reduction plus a little de-hum plus a little compression plus a little EQ can become too much very quickly. Each stage may seem harmless, but together they can reshape the recording beyond recognition. Music production and restoration guides repeatedly warn that aggressive settings and too many notch filters can create artifacts that sound artificial or spectral. Source: https://musicproductionwiki.com/articles/izotope-rx-guide.html
A good rule is to stop as soon as the problem is acceptably reduced. Cleaner is not always better. Trustworthy is better.
How to Audit Cleaned Audio for Artifacts and False Positives
After cleanup, your job is not done. You need to audit the clip like a skeptic. Listen to the original and the cleaned file back to back at matched loudness. Look at the spectrogram. Ask whether any new consonant-like shapes appeared only after processing. Watch for repeating robotic textures, warbling tails, or sudden tone changes that line up with your reduction settings rather than with the source audio.
A useful check is to test whether the suspected EVP still seems present at different playback speeds, on different headphones, and in the raw file. If it disappears completely when the processing is removed, it may have been created by the cleanup rather than revealed by it. This is especially important because listener interpretation is subjective and prior expectation can strongly influence what people think they hear.
If possible, have someone else review the clip without telling them where the suspected voice is. If they hear a different phrase or nothing at all, you may be dealing with pareidolia rather than evidence. That does not mean the clip is worthless. It means it should be presented with caution.
Why Your Restored Audio Sounds Fake After Cleaning
If your restored audio sounds fake, the cause is usually not one single mistake. It is usually a combination of too much noise reduction, over-tight filtering, excessive sharpening of transients, or a spectrum that has been stripped of natural room texture. Human speech depends on a balance of harmonics, sibilance, resonance, and background context. When too much of that is removed, the voice can sound isolated in an unnatural way.
Sometimes the issue is also visual. A spectrogram that looks too clean can make the brain suspicious, while one that contains a few remaining artifacts can be more believable because it matches how real recordings usually behave. For that reason, credibility often comes from modest improvement, not perfection.
If a clip becomes more dramatic but less repeatable after cleanup, step back. Go to the previous version and compare again. The best restored EVP audio sounds like the same recording, only easier to hear.
Best Free Tools for EVP Cleanup: What Audacity Can and Can’t Do
Audacity is a strong starting point because it is free, widely available, and good enough for many common cleanup tasks. It can handle basic EQ, noise reduction, spectral selection, and manual editing. That makes it valuable for investigators who want to learn the fundamentals before buying anything.
What Audacity does well is simple, visual, transparent work. You can inspect the waveform, view the spectrogram, remove a narrow tone, and make light corrections without burying your choices inside an opaque workflow. What it does not do as well is highly adaptive restoration on difficult material. It is not the best choice for heavily contaminated recordings where you need precise de-hum profiling or advanced spectral repair.
So if your EVP is fairly clean and only needs a few careful edits, Audacity may be enough. If the recording is noisy, distorted, or full of overlapping interference, you may quickly reach its limits.
Best Premium Audio Restoration Tools for Serious Paranormal Creators
If you produce a lot of paranormal content or regularly work with difficult evidence, premium tools can save time and give you more control. Adobe Audition offers a practical middle ground with noise reduction, hiss reduction, and spectral workflows that are approachable for creators who already know basic editing. iZotope RX is the deeper toolset, especially when you need de-hum, de-noise, and targeted repair with fine control over the artifacts you introduce.
The advantage of premium software is not just quality, but precision. You can isolate a noise sample, profile hum harmonics, tune thresholds, and compare results more systematically. That matters when you want your process to be defensible. In paranormal work, the cleaner your workflow, the easier it is to explain why a clip should be trusted.
Still, premium software does not solve the core problem of interpretation. It only gives you better tools to preserve what is already there.
Case Study: Restoring a Smartphone EVP Recording
Imagine a phone recording made in a hallway with a faint voice at the end of a sentence. The raw file has room echo, low-frequency rumble, and a constant hiss from the microphone preamp. At first listen, the phrase is almost impossible to understand.
The safest workflow would be: duplicate the file, trim only the obvious dead space, capture a noise print from a section without speech, apply light noise reduction, then use a gentle high-pass or low-cut to remove sub-bass rumble. After that, inspect the spectrogram for any narrow tones or clicks. If a 60 Hz hum is present, remove it with a modest notch rather than a broad sweep. The result may not become crystal clear, but the voice could become more intelligible without sounding unnatural.
In a smartphone case like this, restoration often improves more than you expect because the main issue is usually low input quality rather than extreme interference. But the conclusion should still be cautious. If the phrase becomes understandable only after extreme processing, it should be treated as a candidate interpretation, not a confirmed EVP.
Case Study: Restoring Audio from a Dedicated EVP Recorder or Spirit Box Session
Now consider a dedicated recorder or spirit box session captured in a basement with fluorescent lights, radio sweep noise, and a few moments that sound speech-like. Here the challenge is different. The audio may already be dense with intentional noise, so the goal is to remove only the interference that clearly does not belong while leaving the session character intact.
A careful restoration might begin with de-hum if an electrical tone is present, followed by a very light hiss reduction only if the sweep noise does not already dominate the clip. Spectral editing might then be used to reduce a single whistle or spike that masks a suspected phrase. But because spirit box audio is inherently noisy, too much cleanup can erase the very texture that makes it interpretable.
This is where discipline matters most. If you cannot clearly show that an edit removed a non-speech artifact, do not make the edit. It is better to have a slightly messy recording that reflects the session honestly than a polished clip that nobody can trust.
What Audio Restoration Can Improve and What It Can Never Recover
Restoration can improve intelligibility, reduce fatigue, and make comparisons easier. It can help you isolate a hum, lower hiss, separate a voice from room noise, and identify sections worth reviewing more closely. It can also improve the presentation of evidence when you need to share a clip with others.
What it can never do is recover information that was never captured. If the microphone clipped, if the voice was masked completely by another sound, or if the signal was so weak that the content is only imaginary, no amount of editing can recreate the truth. Restoration can reveal, but it cannot invent. That is the boundary every investigator needs to respect.
FAQ: How Do I Make Distorted Spirit Box Voices Clear?
Start with the lightest possible cleanup. Remove obvious hum first, then reduce only the most stable background noise. Use the spectrogram to inspect whether the voice is actually present or whether you are hearing fragments created by the sweep pattern. If the voice becomes clearer only after heavy processing, treat it cautiously. A clear-sounding result is not automatically a truthful result.
FAQ: What’s the Best Tool to Remove Hum from EVP?
For basic work, a notch filter or simple EQ may be enough if the hum is fixed and predictable. For more advanced control, iZotope RX is especially strong because its De-hum module can learn the hum profile and remove harmonics with less collateral damage when used carefully. Adobe Audition also offers helpful noise reduction and hiss reduction tools for broader cleanup. Source: https://www.izotope.com/en/learn/deep-dive-into-rx-de-hum.html and https://helpx.adobe.com/audition/desktop/effects-reference/noise-reduction-restoration-effects.html
FAQ: How Much Cleanup Is Too Much for Paranormal Evidence?
Cleanup is too much when the recording no longer resembles the source file, when new artifacts appear, or when the result sounds more eerie than it sounds accurate. If your process changes the perceived message instead of clarifying the original, you have probably crossed the line. Good restoration should make evidence easier to test, not easier to believe.
A Credibility-First Checklist for Publishing Cleaned EVP Audio
Before publishing any cleaned clip, keep a checklist. Save the original file. Save every intermediate version. Note the tools and settings used. Compare before and after at matched loudness. Check the spectrogram for artificial tones or missing material. Ask whether the cleaned version improved intelligibility without creating new speech-like shapes. Get a second listener if possible. And be honest about uncertainty when the clip remains ambiguous.
That credibility-first mindset is what separates careful paranormal work from content farming. If you want to build trust with viewers, collaborators, and fellow investigators, the most important thing you can do is show your process as clearly as you show your conclusion. The right restoration workflow does not make every EVP undeniable. It simply gives the real ones a better chance to be heard.
